Gifts in a Bottle Tutorial
I am actually posting this before I send it, so if my recipient happens to read this...my bad. I hope it's fun to receive anyway. It's just that a lot of people have asked me to post this.
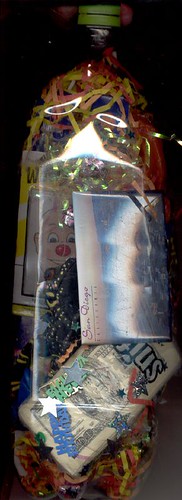
I can't take credit for this idea--I learned it in a stamping class. I want to share it lest some of you don't know that the post office allows you to mail goodies in bottles. I most often do this for birthday gifts, but a 'just because' is good enough reason for something fun like this. The really cool part is all the comments you get while you're standing in line at the post office, not to mention the gasp at the receiving end. Here's one I sent to Mary.
The key here, is to examine who your recipient is, and include items specifically appropriate for that individual. What does he/she like to do (travel, sew, knit, read, etc)? What fun goodies can you use to symbolize these interests (toys, etc)? This about pop! bang! in your face celebration. Think balloons, confetti, party favors.
Besides birthday gifts, other ideas might be:
Party invitations. A co-worker of mine sent out invitations to her son's Pirate Party, using 16 ounce coke bottles, filled with a bit of sand, chocolate coins, a pirate sticker, and a scroll listing a treasure map to the party.
A (literally) message in a bottle to a loved one. A love letter.
Goodies from a trip, sent while traveling.
Holiday wishes. Maybe even Christmas cards. I can envision tree-shaped confetti, red and green ribbons, a hand-calligraphied card....
Would be adorable for easter with how-to eggs in a Martha stewart fashion, a bunny-shaped cookie and/or cookie cutter, pastel confetti, a stuffed bunny, maybe a tiny Peter Rabbit book...
Gifts for a baby shower (bib, rattle, small stuffed toy, etc)
Gifts for a gardener (gloves, seed packets, decorative stakes, etc)
Gifts for the artist (pastels or chosen medium, gift certificate to art supply store, rubber stamps, inks, collage materials, etc)
Gifts for the crafter/seamstress (fabric, paper, pincushion, shrinky dink pins you've created, patterns, bodkin or other useful tools, trims and ribbons, buttons, etc)
A 'just because' or 'I'm thinking of you'
The possibilities are endless! Use your imagination.
Okay, here's how you begin.
1) Choose your bottle. Plastic, obviously. Any size will do, depending on the size and quantity of the gifts you want to mail. I prefer clear bottles so goodies are easily seen. The idea here is to make this look like you somehow magically managed to get the goodies inside. Bottles come in a variety of shapes and sizes. I like huge Shasta bottles, but some water bottles are really huge! Or some water bottles are really tiny. Choose whatever works for you.
2) Peel off the label, and remove the glue residue. You might have to use a solvent. Make sure the bottle is thoroughly washed and dried.
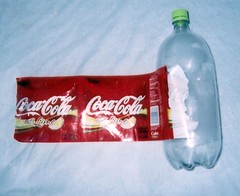
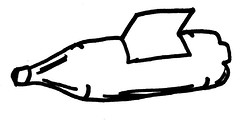
3) Where the glue had been, use a box cutter or exacto knife to make an incision (careful!), trying to make as small a cut as possible to get the items in but still be able to cover it up at the end with your mailing label. Make cuts on either end of the incision, so you have a three-sided box-shaped flap that you can stick your hand into. So the idea here is to make a cut large enough to slide your hand in, but small enough to hide at the end.
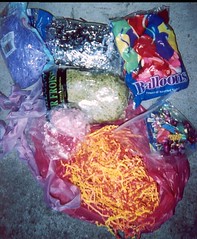
4) Start with a bit of filler and keep adding. You need a base filler of something like:
curling ribbon or shredded ribbon, paper strips, easter grass-type or tinsel filler, etc along with things like confetti, unfilled balloons, crayons, birthday candles, etc. Make it pretty. Make it fun. Consider holiday colors, or the recipient's favorite colors, or something theme-appropriate.
5) Bring on the gifts, baby! Have some wrapped, some unwrapped and visible. Think of how this appears on the finished exterior--the point is to have cute toy faces, etc sticking out on all sides, remembering the area of the incision will not be visible. Take your time--it takes a while to get items faced correctly and to fit everything in just right. I end up taking knitting needles at the end and cramming in more paper tinsel in places, just to make it look properly festive without covering up the gifts. I drop in stars or other confetti through the top and distribute it around. Think fun, fun, fun!
Gifts might be:
small books,
soaps,
candles,
small stuffed animals,
party favors (little trinkets, horns, etc),
gift cards to a favorite retailer or restaurant or fast food place,
tickets to a concert/movie/theatre event,
magnets,
makeup (as long as it isn't going to easily get damaged or spill)
regional items to share where you live if it's far away,
recipe cards with hand-written favorites,
buttons (both sewing and the pin-on type),
sewing patterns
sewing, cooking, or other small booklets of interest
cupcake liners, decorating sugar, cookie cutters, or other kitchen items
seashells,
lottery tickets if applicable,
yarn or fabric
Gold dollars or Susan B. Anthony coins
something handmade-by-you
jewelry...
Even if it's for an adult, toys are a must. I like to include little wind-up toys.
Novelty candy is also a must Or candy that says something (Look, Sugar Daddy, 100,000 dollar bar, lollipops, etc). And special candy too (truffles in a little wrapped box, the recipient's favorites, stuff regional to you, etc). The more goodies the better (duh). Especially chocolate (double duh).
You might want to include a card.
Stay away from breakables, anything really valuable, liquids, chemicals...just use common sense.
6) Glue the lid on. Just run white glue or tacky glue on the inside of the cap and screw it back on.
7) Use clear two-inch tape to cover incision. Cover incision with a mailing label, preferable a home-made one (rubber stamping works well for this). If unsightly areas where you cut still show, cover them up with stickers.
8) That's it! Just mail it.
This one is going to the UK--so mailing abroad is even okay! Pretty cool, huh?
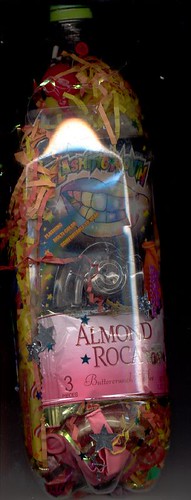
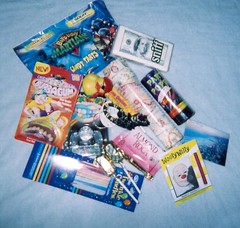
This one I'm making is for a guy who mentioned on his blog that he hates having a birthday because he's uncomfortable with all the attention. I told him it's his special day and just enjoy it already. I hope he likes the goodies I'm sending. Kaleidescope for wanderlust and travel interests, wind-up toy, gecko flashlight all from Cost Plus. Almond Roca and See's sucker are good USA treats. Novelty candy is super fun, so I added Butt-Ugly Martian candy (that really is the name) from the 99 cent store (seriously, how fun is that?!). San Diego magnet is pretty, regional, but not cheesy tourist crap. I'll include a San Diego-themed gift card. Pirate rubber ducky. Dollar bill kleenex....Most important gift is the handmade bookmark, made especially for him. I'll post that item later (not quite finished yet, so I'm not going to seal my bottle).

I can't take credit for this idea--I learned it in a stamping class. I want to share it lest some of you don't know that the post office allows you to mail goodies in bottles. I most often do this for birthday gifts, but a 'just because' is good enough reason for something fun like this. The really cool part is all the comments you get while you're standing in line at the post office, not to mention the gasp at the receiving end. Here's one I sent to Mary.
The key here, is to examine who your recipient is, and include items specifically appropriate for that individual. What does he/she like to do (travel, sew, knit, read, etc)? What fun goodies can you use to symbolize these interests (toys, etc)? This about pop! bang! in your face celebration. Think balloons, confetti, party favors.
Besides birthday gifts, other ideas might be:
Party invitations. A co-worker of mine sent out invitations to her son's Pirate Party, using 16 ounce coke bottles, filled with a bit of sand, chocolate coins, a pirate sticker, and a scroll listing a treasure map to the party.
A (literally) message in a bottle to a loved one. A love letter.
Goodies from a trip, sent while traveling.
Holiday wishes. Maybe even Christmas cards. I can envision tree-shaped confetti, red and green ribbons, a hand-calligraphied card....
Would be adorable for easter with how-to eggs in a Martha stewart fashion, a bunny-shaped cookie and/or cookie cutter, pastel confetti, a stuffed bunny, maybe a tiny Peter Rabbit book...
Gifts for a baby shower (bib, rattle, small stuffed toy, etc)
Gifts for a gardener (gloves, seed packets, decorative stakes, etc)
Gifts for the artist (pastels or chosen medium, gift certificate to art supply store, rubber stamps, inks, collage materials, etc)
Gifts for the crafter/seamstress (fabric, paper, pincushion, shrinky dink pins you've created, patterns, bodkin or other useful tools, trims and ribbons, buttons, etc)
A 'just because' or 'I'm thinking of you'
The possibilities are endless! Use your imagination.
Okay, here's how you begin.
1) Choose your bottle. Plastic, obviously. Any size will do, depending on the size and quantity of the gifts you want to mail. I prefer clear bottles so goodies are easily seen. The idea here is to make this look like you somehow magically managed to get the goodies inside. Bottles come in a variety of shapes and sizes. I like huge Shasta bottles, but some water bottles are really huge! Or some water bottles are really tiny. Choose whatever works for you.
2) Peel off the label, and remove the glue residue. You might have to use a solvent. Make sure the bottle is thoroughly washed and dried.

3) Where the glue had been, use a box cutter or exacto knife to make an incision (careful!), trying to make as small a cut as possible to get the items in but still be able to cover it up at the end with your mailing label. Make cuts on either end of the incision, so you have a three-sided box-shaped flap that you can stick your hand into. So the idea here is to make a cut large enough to slide your hand in, but small enough to hide at the end.

4) Start with a bit of filler and keep adding. You need a base filler of something like:
curling ribbon or shredded ribbon, paper strips, easter grass-type or tinsel filler, etc along with things like confetti, unfilled balloons, crayons, birthday candles, etc. Make it pretty. Make it fun. Consider holiday colors, or the recipient's favorite colors, or something theme-appropriate.

5) Bring on the gifts, baby! Have some wrapped, some unwrapped and visible. Think of how this appears on the finished exterior--the point is to have cute toy faces, etc sticking out on all sides, remembering the area of the incision will not be visible. Take your time--it takes a while to get items faced correctly and to fit everything in just right. I end up taking knitting needles at the end and cramming in more paper tinsel in places, just to make it look properly festive without covering up the gifts. I drop in stars or other confetti through the top and distribute it around. Think fun, fun, fun!

Gifts might be:
small books,
soaps,
candles,
small stuffed animals,
party favors (little trinkets, horns, etc),
gift cards to a favorite retailer or restaurant or fast food place,
tickets to a concert/movie/theatre event,
magnets,
makeup (as long as it isn't going to easily get damaged or spill)
regional items to share where you live if it's far away,
recipe cards with hand-written favorites,
buttons (both sewing and the pin-on type),
sewing patterns
sewing, cooking, or other small booklets of interest
cupcake liners, decorating sugar, cookie cutters, or other kitchen items
seashells,
lottery tickets if applicable,
yarn or fabric
Gold dollars or Susan B. Anthony coins
something handmade-by-you
jewelry...
Even if it's for an adult, toys are a must. I like to include little wind-up toys.
Novelty candy is also a must Or candy that says something (Look, Sugar Daddy, 100,000 dollar bar, lollipops, etc). And special candy too (truffles in a little wrapped box, the recipient's favorites, stuff regional to you, etc). The more goodies the better (duh). Especially chocolate (double duh).
You might want to include a card.
Stay away from breakables, anything really valuable, liquids, chemicals...just use common sense.
6) Glue the lid on. Just run white glue or tacky glue on the inside of the cap and screw it back on.
7) Use clear two-inch tape to cover incision. Cover incision with a mailing label, preferable a home-made one (rubber stamping works well for this). If unsightly areas where you cut still show, cover them up with stickers.
8) That's it! Just mail it.
This one is going to the UK--so mailing abroad is even okay! Pretty cool, huh?

This one I'm making is for a guy who mentioned on his blog that he hates having a birthday because he's uncomfortable with all the attention. I told him it's his special day and just enjoy it already. I hope he likes the goodies I'm sending. Kaleidescope for wanderlust and travel interests, wind-up toy, gecko flashlight all from Cost Plus. Almond Roca and See's sucker are good USA treats. Novelty candy is super fun, so I added Butt-Ugly Martian candy (that really is the name) from the 99 cent store (seriously, how fun is that?!). San Diego magnet is pretty, regional, but not cheesy tourist crap. I'll include a San Diego-themed gift card. Pirate rubber ducky. Dollar bill kleenex....Most important gift is the handmade bookmark, made especially for him. I'll post that item later (not quite finished yet, so I'm not going to seal my bottle).



6 Comments:
yay! thanks barb! i know everyone will appreciate all your ideas and the tute!
Cool! You've got my brain working...
That is so neat! I may have to steal that idea . . . ofcourse I'm guessing that's why you posted a tutorial. ;)
Barb - this is an awesome idea! Thanks so much for sharing. I am going to try this for a friend's birthday later this month. I think a trip to the Dollar Tree is in order! ;)
Where do you find these neat ideas??!! That is a cool version of mail art - even better than embroidered envelopes!
I've done this for my little cousins and they just love it! I send it in the mail with a fake soda address label and the kids are so busy trying to figure out how things got in there, they forget about opening it for a while!
Post a Comment
<< Home