Soft Fabric Baby Blocks
I was invited to a baby shower of one of my co-workers, and decided to make her fabric baby blocks.
I already knew that mom-to-be Amber likes Amy Butler fabrics (I made the ring bearer pillow for her wedding from Amy Butler's mod pillow pattern, and we've discussed AB fabric designs before), I knew she is going to be having a girl and naming her Ashlyn, and I knew the baby's room is lime green and pink paisley.
So first off I bought an Amy Butler Lotus fabric: Star Paisley in lime
And Amy Butler Daisy Chain Flowers, and Jasmine
plus I already had some pink and green fabrics left over from my entry for the Amy Butler purse challenge.
I found this tutorial online by Motherhood for Dummies with this cute idea to make puzzle blocks
and this tutorial on Whipstitch with more info
but the most informative how-to was the tutorial on Flickr by London Mummy
Though I didn't use the idea this time, one of the comments suggested to stuff the cubes with strips of plastic grocery bags (the crinkling sound is fun), and to use a cat toy instead of a jingle bell inside, if you want the cube to rattle (less choking hazard).
All the tutorials claimed this was a really easy project, but it took me FOREVER to make these.
I used a magnifying lamp to handstitch the last opening closed, using tiny stitches that are barely visible.
The hand stitching took me over four hours alone.
I decided not to make these rattle, so did not include a bell inside.
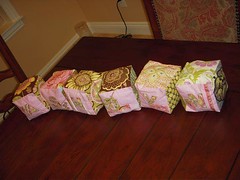
I also decided, rather than puzzle blocks, that I'd do alphabet blocks, and I'd spell out her name.
That meant I needed to make six cubes, so I cut out 36 five-inch squares in several fabrics (I used 13 different fabrics).

Oops, didn't spell it correctly here!
(sorry the image is so small. Click on any image to enlarge)
I made sure the placement of the fabrics was unique, with especially nice prints on each end of the first and last block, as well as on the top side of all six.
Initially I wanted to make at least two quilt blocks, but I just didn't have the time.
I chose each background on the alphabet side as pale pink, with the letter fabric the green paisley print.
I couldn't find any cute letter designs in coloring books or quilt books, so I had to settle for a standard two-inch stencil that I found at Michael's.
I fused each (fussy cut) letter in place, then used a small zigzag (from my new machine!) to adhere it in place.
I chose a variegated thread that appeared pink and green, but when I used it I discovered it's actually orange, blue, green, and purple.
I actually still really liked it, so I used it throughout.
Go figure!
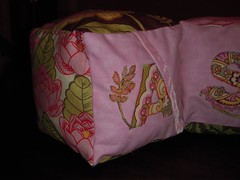
I added three trims to the alphabet side--a velvet ribbon, a polka dotted ribbon, and a pink and green rick rack.
That seemed too plain, so I embellished each letter with fabric floral motifs that I fused, then stitched.
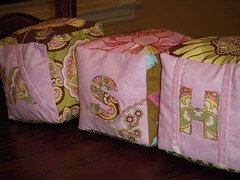
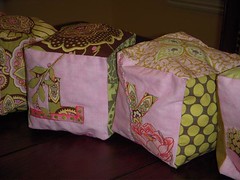
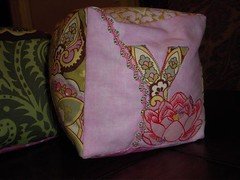
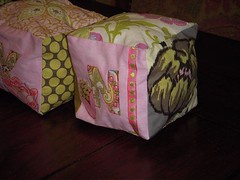
I think they turned out really cute!
Unfortunately, I lost my invitation so therefore didn't have the address of the shower, so didn't attend :(.
I'll give these to her later.
I already knew that mom-to-be Amber likes Amy Butler fabrics (I made the ring bearer pillow for her wedding from Amy Butler's mod pillow pattern, and we've discussed AB fabric designs before), I knew she is going to be having a girl and naming her Ashlyn, and I knew the baby's room is lime green and pink paisley.
So first off I bought an Amy Butler Lotus fabric: Star Paisley in lime

And Amy Butler Daisy Chain Flowers, and Jasmine

plus I already had some pink and green fabrics left over from my entry for the Amy Butler purse challenge.
I found this tutorial online by Motherhood for Dummies with this cute idea to make puzzle blocks

and this tutorial on Whipstitch with more info
but the most informative how-to was the tutorial on Flickr by London Mummy
Though I didn't use the idea this time, one of the comments suggested to stuff the cubes with strips of plastic grocery bags (the crinkling sound is fun), and to use a cat toy instead of a jingle bell inside, if you want the cube to rattle (less choking hazard).
All the tutorials claimed this was a really easy project, but it took me FOREVER to make these.
I used a magnifying lamp to handstitch the last opening closed, using tiny stitches that are barely visible.
The hand stitching took me over four hours alone.
I decided not to make these rattle, so did not include a bell inside.
I also decided, rather than puzzle blocks, that I'd do alphabet blocks, and I'd spell out her name.
That meant I needed to make six cubes, so I cut out 36 five-inch squares in several fabrics (I used 13 different fabrics).

Oops, didn't spell it correctly here!
(sorry the image is so small. Click on any image to enlarge)
I made sure the placement of the fabrics was unique, with especially nice prints on each end of the first and last block, as well as on the top side of all six.
Initially I wanted to make at least two quilt blocks, but I just didn't have the time.

I chose each background on the alphabet side as pale pink, with the letter fabric the green paisley print.
I couldn't find any cute letter designs in coloring books or quilt books, so I had to settle for a standard two-inch stencil that I found at Michael's.
I fused each (fussy cut) letter in place, then used a small zigzag (from my new machine!) to adhere it in place.
I chose a variegated thread that appeared pink and green, but when I used it I discovered it's actually orange, blue, green, and purple.
I actually still really liked it, so I used it throughout.
Go figure!

I added three trims to the alphabet side--a velvet ribbon, a polka dotted ribbon, and a pink and green rick rack.
That seemed too plain, so I embellished each letter with fabric floral motifs that I fused, then stitched.


I think they turned out really cute!
Unfortunately, I lost my invitation so therefore didn't have the address of the shower, so didn't attend :(.
I'll give these to her later.
Labels: gift, sewn by me, toy


6 Comments:
These are so very pretty, love the letters and floral motifs you added - I'm sure that when you do get to give them to your friend, she will be absolutely delighted :)
Was there a particularly stage that you found took the time?
& your next set can be for JACOB. :o)
they are lovely... I really like that monkey set...
London Mummy: I don't have your email address (it doesn't come up in my comment notification), so I hope you see my answer here. I think part of my problem is that I just got a new machine and I had to learn how to use it. Too, it just seems to take me a long time to sew anything. I read these blogs where people are whipping out projects in an hour, and I just don't get that. It took me hours just to cut out the squares! And I think there had to be an easier way to sew these, like putting the needle in the seam, lifting the pressure foot, and going to the next side. But I couldn't figure out how to do that and not tangle the pressed-open seam allowance, so I sewed each side individually. I'm really pretty much over sewing blocks now, lol. Though am I am pleased with how these turned out--cuter than the photos indicate actually, thanks to the Amy Butler fabric.
Lovely job Barb! I think they will be a firm fav and one of the treasured memories of childhood.
These are just beautiful. I love the little details on the letter blocks.
Hi again Barb, you may have them already but if not, it is well worth investing in a cutting mat, rotary cutter and steel ruler. The cutting mat has grid measurements marked on it and the rotary cutter etc allows you to cut through several layers of fabric at once which would save you lots of time. Although, I read you are "so over" sewing baby blocks they would be useful for future sewing projects, but I do still think that your blocks are extremely cute :)
Post a Comment
<< Home