Saturday, May 01, 2021
Friday, March 26, 2021
Lamb Spaghetti
Friday, December 18, 2020
Dumpster Ornament
My friend Jen called on her friends to get their craft on and contribute to her 2020 themed tree. I decided to paper mache a dumpster fire. I’m a lifelong perfectionist, but this was a good lesson in letting go and not worrying about perfect. It’s okay that it’s lumpy and crooked—real dumpsters are too!
I started with thin cardboard and decided on a size and shape. Then I started gluing 
The first layers of paper mache were torn pieces of newspaper, then I switched to cut strips because it mimicked corrugated metal. I wasn’t precise for once
I added skewer strips to define the top edge
And no, Barb, you don’t need to spend $6 on dollhouse-sized castor wheels. Beads are fine! It’s an ornament, it’s handmade, it’s fun to make something again. 
Oops painted before I realized I forgot to add the side pieces. Also added signs and dirtied it up with wood filler.

I hadn’t paper mached in decades. I’m pretty pleased with how it turned out. I had planned to stitch the fabric flames together like a pilllow, but my friend Michelle suggested gluing it to cardboard, and I think that was a better option. It has a cartoon effect 
I wanted to fill the interior with colored styrofoam—notoriously wasteful and thrown out versus recycled, which seemed apropos, but I couldn’t remember where I put it, so I just added red paper. Everything was sealed with a coat of Mod Podge, and a chain added for hanging 
Saturday, October 03, 2020
Laura Dress
This is my first time sewing a Rebecca Page pattern. I made the fabric by piecing together upholstery samples that were destined for the trash. I always have to make things waaaay more difficult, but I wanted to use up/upcycle some of my upholstery samples. I used to work at an interior design showroom, and they’d throw out their discontinued samples. I couldn’t stand the waste, so I took several home.
I found two fabrics with different styles but colors that blended well. Both the rust colored birds and and scallop are the same high end manufacturer. When I worked for the showroom a couple of years ago, the bird print was $156 per yard, and the scallop was $122 per yard. Both are 100% cotton. It’s not heavyweight like many upholstery fabrics, but it’s not as light as standard cotton either. The bird print faded quite a bit when I washed and dried it, but upholstery has all sorts of nasty chemicals on it to resist stains (some carcinogenic), so it had to be washed. I don’t wash samples when I make things like throw blankets, but a garment is different.
The challenge with using samples is that some are small pieces, some have holes from where they were hung for display, and some have grommets in them to prevent designers from borrowing samples and making pillows or something and not paying for the yardage. So that means the only way my fabric is wide enough or long enough to accommodate cutting out my pattern pieces is I have to collage pieces together.
The bird print wasn’t long enough to accommodate the full pattern piece, so I decided to add a band of the scallop to the bottom of both front and back (matching those was challenging on a high-low hem), as well as to the front shoulder. I also cut my pattern apart to add 5” in length (4” after seam added), and I cut off the two band pieces and the two shoulder pieces. In other words, I cut the two main pieces into five pieces (see what I mean by making it more difficult, lol?) I also graded the pattern between a XXL top and XL bottom. I was just winging it and hoping it turned out. I know zero about alternating or adjusting patterns.
The front piece laid out nicely with a design centered. The remaining sample of bird fabric was too narrow for the back pieces, so I had to bring in a third fabric to supplement.
I found a sample linen blend that matched the color well. One option was to have cut out one half back side in the linen (like a colorblock), or another option was to have added strips going down my sides. Instead I chose to add strips to the center back, almost like a mock zipper. The linen blend is a heavier weight than the two cottons. I did not use French seams in this project (Rebecca Page patterns recommend French seams) because it was an added level of difficulty that was too much when so much piecing was involved.
I only had two small samples of the scallop, so I knew to cut the bands first, and the front shoulder if I had enough. I had to cut the shoulders cross grain, keeping in mind pattern direction had to match. I didn’t have enough scallop for the back shoulder, so I used the linen. Funny, when I started I thought the scallop was the star fabric, but turns out the linen makes this dress special. Go figure.
Back:
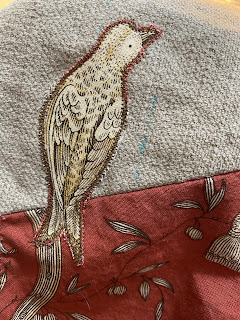
I accidentally cut into one back shoulder piece, so I repaired and covered with an appliqué
I had to piece the strips (both the scallop and the linen) to make them long enough, so I hid the seams with appliqués (I thankfully had fabric left)
Off center front seam:
Yeah, there’s a lot going on, but I’m pleased with the result, and basically I made something out of trash. That’s pretty cool. I’m 5’2” and adding 4” put the length right above my knee. The shoulder and neck area is too big, so next time I’ll size down and do a bust adjustment instead.
Friday, October 02, 2020
Flower Power Caftan
Whoa, it’s been six years since I last posted?! Time zooms. Now that we’re six months into this pandemic, I’ve been embracing home projects, cooking, and I finally dusted off my sewing machine. And that has me missing blogging, sharing, writing, and getting inspired by others. I’m trying to not get swept up in the drama of doomsday Facebook posts, or the negativity of accusatory and shaming posts, or the endless political rants. It’s too much. Right now I want to try new recipes, and make my home more inviting, and get back to crafting.
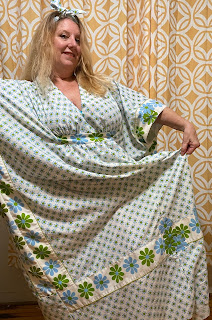
I’m in two Facebook caftan groups, and have met people for caftan walks and photo opps at events. I don’t know where this vintage sheet came from that was in my stash, but I decided to turn it into a caftan using a current pattern, Simplicity 8505.
Of course I always tend to make projects more difficult, but I had my heart set on using the border along the outside edge. I had to cut crossgrain and piece to make this happen, and I didn’t have enough border to go around the back, but overall I think it works.
I laid the pattern out so the flowers matched up on each side. I wanted them to be reversed, but I messed up somehow on one side and they match. Kinda bummed about that, but no one else will probably notice.
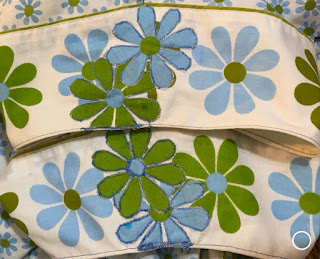
In areas where I had additional seams from piecing, I covered these up with appliqués.
Center front:
Sleeves:
Sunday, June 22, 2014
Palm Tree Apron
I finally managed to get my hands on this vintage apron pattern from 1949.
I like to purchase originals, versus reproductions, so it's usually a waiting game on eBay or etsy, but eventually I always find what I'm looking for.
I can see this embroidery on the hem of a dress, or in quilt squares.
So pretty!
(please don't ask me for copies of my patterns. I get bombarded with requests, and it's overwhelming. It's almost impossible to scan pattern pieces, and there are copyrights on most patterns too. Sorry.)
Thursday, June 19, 2014
Art in Embroidery
I'd like to possibly have it cleaned, then mounted under glass.
It was listed as a "geometric tapestry", and the seller thought it might be Peruvian.
I just fell in love with it (it's the most money I've ever spent on an eBay auction, around $133).
The size is roughly 29" by 31".
There's one repair on itThe underside of the same repair
There is also an area that looks like it's not tacked down or is about to fray, and the border is missing on part of the piece.
I don't know what the symbolism of the shapes mean, but I'd like to find out.
I'm also curious about the age of this piece.
Does anyone know if textiles like this should be cleaned or left as is?
How does one find someone who can mount this safely, without damaging the piece?
I consider this a work of art, and I'd like to display it and care for it.


