Saturday, March 27, 2010

No Peeking, Jackie!

I've been intending to complete this project for quite awhile now.
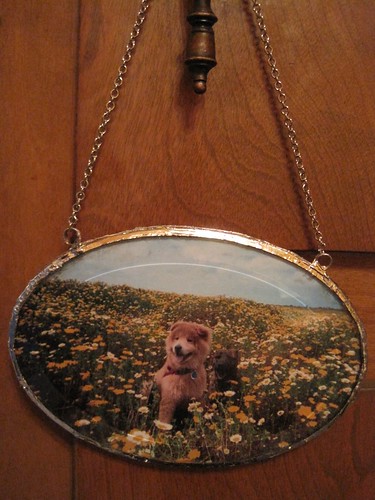
I had taken some super cute photos of doggies Dylan and Reese a year ago (surprisingly good quality from a disposable camera!).
I set the pics aside and didn't show the owners, knowing these were so special that I knew I needed to make something.
I did blog one, hoping the owners didn't see it.

At first I was thinking I'd place the photos back-to-back under glass and make a Christmas ornament.
But that would have meant reducing the size of the images, and I really wanted the full impact of a 4" x 6".

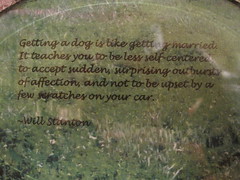
So I thought, well, I can still place them under glass, but I'll make two, with a dog-themed quotation on the reverse.
The finished product can hang on a wall or whatever.
I found some amazing beveled glass at Alpine Glass (a stained glass store in San Diego).
Soldering stuff at the ready

I envisioned these hanging by a chain, so an employee at Alpine glass showed me how to twist copper wire around a pencil to make the loops for hanging.


Christmas came and went, but I still wanted to finish this.
Jackie (their "mom") just had a birthday this week, so I pushed myself to work on the project.
Ta Da!
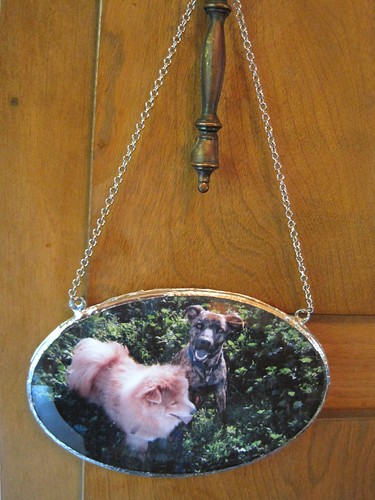
Soldered Ornament
Another Soldered Ornament

One of the reasons it took me so long to get around to putting these together was that I got hung up on what paper to use on the reverse--what paper should the quote be on?
Certainly not something plain...but what?
Should I collage the reverse in dog-themed images?
Nah...too busy.

And it finally dawned on me what to use for the reverse--the greenery from Fiesta Island (the same location as the other photographs).

So I took a photo I had of Leroy, and I cropped out the green.

Leroy

That way the reverse is in the same color family, and I think it works
(a bit of glare from the night shot...lights hitting the glass)
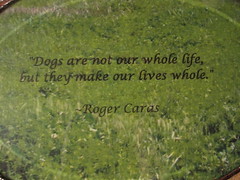
Reverse side of soldered ornament
Dog Quote on soldered ornament

But let's be real, shall we?
These are far from perfect, but the more I messed with it, the gloopier it got.
Ugh!
But then that tends to be my style, if you followed my making of the butterfly charms at all.

At one point, I peeled off the copper tape that I had already soldered, and started again.
Aarrgghhh.

Then my iron got too hot, and repeatedly going over an area left it burned (oops!)
I have one iron that doesn't get hot enough, and another that gets too hot.
I need a really decent stained glass-quality soldering iron
So I mended it.


Finally, at some point, I just had to step away and call it okay.
As Sally Jean Alexander would say, "Love and embrace"
(I will be blogging about my class with her soon, by the way).

I'm pretty sure Jackie is going to love these though.
Between those cute faces and that gorgeous glass--they'll make her smile.

Labels: , ,

Monday, February 16, 2009

Swap charms received

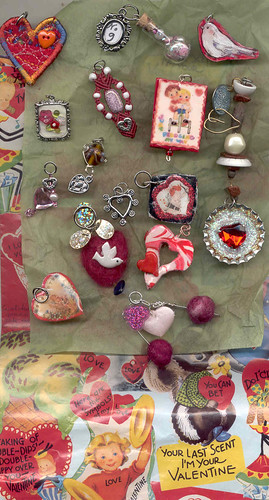
I picked my charms up from the post office today (thankfully, there was a key to a locker in my mailbox on this holiday), from the Romancing the Charm Swap.
Trish has posted about each participant's charm, so read the details on her blog.
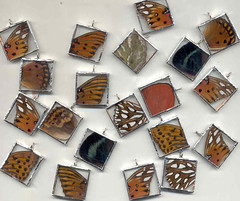
This is the swap for which I made the soldered glass charms with butterfly wings.
It's fun that what I received are all so different--some are felted, one is a wrapped bead, others are polymer clay, or bottle caps.

Romancing the Charms Swap Received
I love the little vial of Love Potion #9; its bottle filled with pearls, pink sequins, and glitter.
The quilted heart is just beautiful, and I'm glad to have received something made of fabric for this swap.
The adorable little bird on the top row is made of shrink plastic.
The long burgundy colored charm in the second row is micro-macrame! Who knew?!

Oops, this one didn't get in the photo as I had it out to remind me I still needed to get the email address of the artist so I could thank her.
This heart, of all things, is a cut and painted gourd.

Trish suggested all the participants use their charms for a bracelet, and I really like that idea.
She said she wore hers to work the other day, and got loads of compliments.

I hope to put my own bracelet together soon.

Labels: , ,

Friday, February 06, 2009

The charms I made for the Valentine's Day Swap

When I mentioned all the hard times I had with the Romancing the Charm swap, I didn't mean to warn anyone off swaps, I was just saying I somehow have a talent for making everything more complicated and more expensive than it needs to be.
I continued, even after the class, to have issues.
It took me forever to make the charms, they're far from perfect, and they're far too fragile, but hopefully they'll be well received.

The swap required I come up with an idea for 19 identical charms for Valentine's Day.
I gave it serious thought, as I think art in any form deserves intention and a degree of symbolism.

I like what I do to carry some form of meaning.

The crucial part is that fine line where you've over-thought the process, or where you didn't know how to edit...so you wind up with something too cluttered.
In all things, one must remember:

In simplicity lies elegance.

At the start, I figured I'd make a collage.
I began with listing symbols associated with love and Valentine's Day, from cupid to Conversation Hearts candies.
For collage materials, I thought of the Queen of Hearts playing card, or an illustration of the Queen from Alice in Wonderland.
'Love' postage stamps, red roses, vintage valentines, lace, the goddess Venus.
I thought of a sepia-toned photograph of lovers from the 1920's, or even a transparency.
A seed packet of Bleeding Hearts flowers would be interesting.
Pearls. Kiss prints.
I thought of using a vintage sewing pattern of a dress with a heart-shaped bodice--all these great ideas in a regular collage, but not when I'm limited in size (per the challenge requirements) to an inch and a half.

But beyond symbolism and design, how was I going to make my charm?
I considered making little paper collages, partially stitched, glued onto altered Scrabble tiles.
This would be especially apropos on an 'X' tile, the universal symbol for 'kiss'.
I also considered collages under resin in bottle caps (both crafts I've only read about, but would like to try).

I considered sewing pink vinyl hearts stuffed with heart-shaped sequins.
Perhaps a tiny mosaic on tin.

What to do? And what should be my design?

In the end, as you know, I decided on soldered glass, but my options for what to sandwich under the glass was still up for debate.

I love text on things, so I thought of including famous quotations about love, or perhaps portions of a famous poem, or song lyrics ("My Funny Valentine"? Or "Tell Him", my favorite song by Lauryn Hill?).

I considered focusing on my favorite phrase, Ndinombethe (pronounced "in-day-nom-bay-tay"), an African expression meaning "As I go, I am wearing you", meaning the effect we have on one another as we cross paths, be it accidental or intentional.
Though the expression refers to even strangers we meet, it certainly also holds true about the one we love, and the indelible imprint love leaves on our hearts.

Then I was sitting drinking my coffee the other morning, my black cat purring on my new soft robe, and out of the blue I thought of butterfly wings.
What a beautiful charm could be made with a piece of butterfly wing under glass.

Wings are simple yet complex, fragile, inherently beautiful....just like love.
The epitome of elegant simplicity.

I found real butterfly wings on eBay, specifically intended for craft use.
The set was for about 80 wings, and I was hoping that 20 of those would be identical (probably monarch), and indeed that was the case.

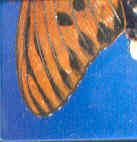
Though most recipients probably covet the beautiful blue wings, and I could probably cut enough squares to use, what I really wanted was wing tips.
I wanted the angles of flight.

I have a photograph at the beach, where the sky is a brilliant blue, and I thought this would make a great backdrop
blue
Even the cloudy sky is interesting
cloudy

For the reverse side, I thought I'd use a sparkly foil, perhaps with organza and the final words of Lenny Kravitz' "You're my Butterfly":
Fly high
fly fly fly

(there's only one inch after all).

But then I was at a client's house, and I noticed a work of art framed in glass.
No mat, no color, just glass.
And I realized that the wing itself is beautiful enough to stand alone.
My pleasant surprise was discovering the underside of the wing is just as lovely.
The bonus is the beauty of God's creation can outshine my limited soldering abilities

So this is what I made
Charms

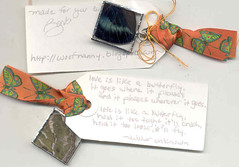
I added a hang-tag for shipping, and included a quotation relating butterflies and love (the author is unknown)
Charms ready for mailing
Love is like a butterfly,
It goes where it pleases
and it pleases wherever it goes.
Love is like a butterfly,
Hold on too tight, it'll crush,
Hold on too loose, it'll fly.


Other interesting quotations I considered:
May the wings of the butterfly kiss the sun
And find your shoulder to light on,
To bring you luck, happiness and riches
Today, tomorrow and beyond.

~Irish Blessing

Happiness is a butterfly, which when pursued, is always just beyond your grasp, but which, if you will sit down quietly, may alight upon you.
~Nathaniel Hawthorne

Labels: , ,

Saturday, January 31, 2009

I think I've got it...finally (scroll down--there ARE photos in this post!)

It was a really big deal that I agreed to join Trish's Romancing the Charm Swap, as I had vowed off swaps for many reasons.
One is that it's just too stressful to put myself out there to be judged.
Call it insecurity or fear or having problems with criticism...but giving or selling my art has never been a motivating factor for me.

Another reason, is things just don't always go as planned.
And that's what has happened this time.
I came up with an idea (which I will blog about soon), and I decided to make soldered glass charms.
That's sort-of biting off more than I can chew, in that I've only made those one time before, and I wasn't even sure if I could pull it off.

Anyway, the process would be comical were it not so frustrating.
First I ordered the glass.
I ended up buying pieces of one inch square glass from Volcano Arts (a really friendly and informative place. The website is filled with ideas and tutorials).
Then I ordered what I placed inside the glass (more soon...).
I already had the copper tape, soldering iron, and flux.

I wanted to attach paper labels, and drove around TWO HOURS one afternoon searching the things out.
None at Michaels, none at Kinkos, sold out at Office Depot...
I finally found some at Joann's, and by that time just nixed the printing and used silver glitter pen to write them out.
Okay, as the money is ching ching chinging away....

I went to solder the charms, and all I got was carbon dust and burned tape.
What is going on????
I drove all the way to the north county to buy new tips for my soldering iron, only to discover the stamping store no longer sold that item.
Crap.
I drove all over town yet AGAIN, this time looking for another iron.
The least expensive version at the stained glass store was $82!
Luckily I had a coughing attack and had to leave before I could consider it.
I ended up buying a lower wattage version at Michaels, just to have something.

I tried again. Same result.
Huh?
In the meantime, Trish was supposed to have received these a week ago.
Okay, the glass, the material, the new iron, the tags, the pens, the sterling silver jumprings and sterling silver loops...I was already creeping up to $100.
Then I got some soldering books from the library, and they said to use non-leaded solder for items that would be handled often, like jewelry.
The solder I already had, and the solder that the stamping store uses, is 60/40.
Lead.
I drove to the stained glass store and bought a tiny spool of Silvergleem for $29.
Holy crap.

And still I have no charms to mail. Geez.

I dropped by a beadstore, and I called the stamp store, asking if anyone could help show me what I was doing wrong.
They suggested I take a class.
Again.
Sigh....

So today I took Beginning Soldering. Again. A $35 class.
The good thing is I can finish my charms now.
It was also good information to learn from a second teacher, because she had different ways of doing things, and it's always interesting to learn new techniques.

I only made one charm today.
The solder is lumpy because this teacher prefers it that way--she taught us to touch the iron along the edge repeatedly.
I've seen in books where some artists like to drop dots of solder along the edge.
I prefer it thin and flat.
It's more fragile that way, but I like the look, so the charms for the swap will be nicer (I hope anyway).

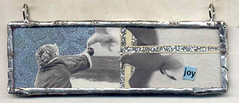
Seagull charm
The lady feeding the seagull at the ocean, and the larger seagull to the right are from actual black & white vintage photographs.
Not very colorful, perhaps, but I love these images.

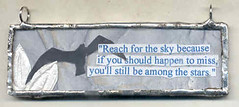
Charm back
The silhouette is also from an actual vintage photograph.
The quotation (author unknown) seemed appropriate with this imagery.

This one was just for practice, the charms for the swap are completely different.
I will blog about those next.

Labels: , ,

Sunday, November 19, 2006

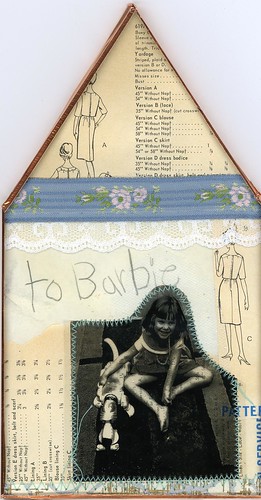
Work in Progress: Soldered House

I attended a class today at Stamping Details, to learn to make a three-dimensional house made up of collages under glass. We were given supplies to make a copy of the teacher's example, or we could choose a theme and make our own version. There were only four of us in the class, two ladies focused on photos of their grandchildren, another lady made hers of herself at Christmas time, and I focused on myself at (mostly) grade-school age.

Here's what will become my front door:
WIP Soldered Front Door
I've posted the photograph previously. I was so rushed for time, that most of the paper used here is original.
Envelope: a card I received.
Background: vintage sewing pattern.
The lace is meant to simulate the roof edge.
The blue trim adds color as well as a sweet, girly quality.
The sparkle behind my head is on tulle.
This piece just needs to be soldered.

The house will be six-sided: two rectangles for the side walls, two long rectangles for the pitch of the roof, and two elonged triagular pieces for the front and the back. The bottom of the house is open so the entire piece can be placed over a light source and illuminated from within. Some of the ladies used color copies of photographs or original photographs, but most of us chose transparencies.

The class was scheduled for six hours, but after almost eight we still weren't finished.
Hence the work in progress.

After all that though, I'd like to share what I've got so far. Note most of the collages are completed, but all need to be placed under glass and soldered, then soldered to one another.

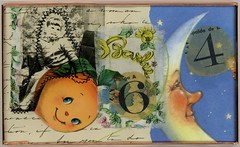
Roof side one: (click on any image to enlarge)
WIP Soldered House Roof 2
Peach: a vintage card I received.
Barbie fabric: vintage 60's also--my mom made me a dress out of that when I was a kid.
Moon: not vintage--it is a card I picked up yesterday in a thrift store, but I liked the idea of the moon on the roof and the similar color scheme.
Numbers: from a sewing pattern, and may be the year that photo was taken of me sitting on the couch in front of a silver Christmas tree, cut out here on a transparency to be me sitting on a peach (eek, now you guys know my age).
Writing is just some copy-right free stuff my teacher gave me to use as a background.
This piece is also under glass and taped, and is awaiting solder.

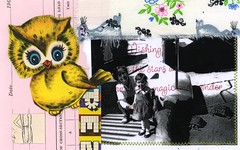
Roof side two:
WIP Soldered House Roof 1
I liked the idea of having an owl on the roof. This owl is original 60's, from a card I received as a child. On the back is my friend Anna's signature, though not visible.
Kitty fabric: also vintage 60's. My mom made me something out of that, and I in turn made a green pillow with a heart-shape cut out using that fabric in the center. I still have it.
The photo transparency is myself and my grandmother at the San Diego Zoo (those are turtles on the right). I have posted this image previously.
This one still needs some more stitching, and needs to still be taped and placed under glass.

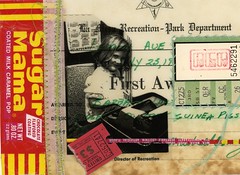
Wall side one:
WIP Soldered House wall 4
A bit of sparkle added with a silver trim. You always need a bit of sparkle!
Ephemera used here is original.
First place for 'biggest and quietest guinea pigs'! That is dated 1970, but I covered it up.
Candy bar wrapper no longer produced.
I had scrapbooks as a kid, and even then saved all kinds of paper. The irony is that I had Pee-chee (now there's a memory) folders filled with magazine clippings that I saved for DECADES. I only recently tossed them all in one of my dreaded de-cluttering phases, wondering what I would ever do with these things. This included old programs to theatre events and productions like Torvill and Dean ice dancing...
Then I took a collage class and realized how it's such a well-suited craft for my interests. Now I'm kicking myself for not saving the stuff. I still have so much crap though--people hate helping me move, that's for sure.
But I digress.
This collage is completed, it just needs to be placed under glass and taped.

Wall side two:
WIP Soldered House wall 3
Sparkle under the hat is on tulle.
In this piece the envelope and Bingo numbers are ephemera the teacher gave me, so that postmark holds no meaning.
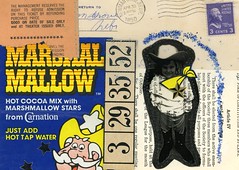
The cocoa and the ticket stub is original, and I can't tell you what made me save that package! Worked out cute though.
This collage is done, I just need to place it under glass and tape it.

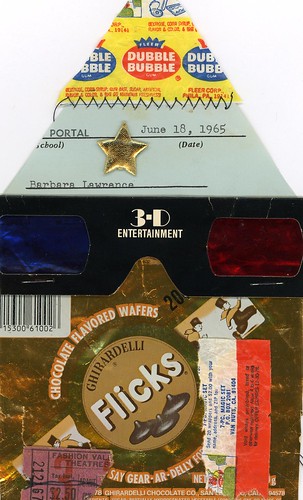
Back:
WIP Soldered Back Door
Blue paper: my actual promotion letter, kindergarten to first grade. It's a shame I didn't photocopy this one and use it again, because the graphics on it are amazing.
3D glasses: original, probably from the 70's.
Candy wrapper: a common movie theatre type no longer available (70's?).
Ticket stub: my actual saved original--note the $2.50 price.
I'm not completely happy with the shiny, over-the-top edge to this collage, and may mess with it a bit. It also still needs to be placed under glass and taped.

Overall a really fun project, a nice way to meet people, and a great way to get ideas.

Labels:

Wednesday, July 05, 2006

Homemade Charms

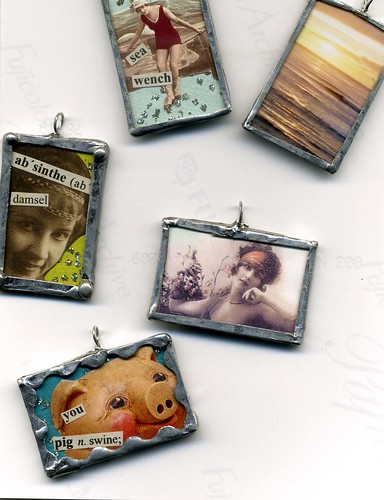
Charms front
My first attempt at collage charms, and learning to solder. These I made recently in a stamping class. These are microscope slides that have been cut in half, small paper collages are put inside two pieces of glass, then copper tape is used to secure the glass together. The copper is then covered with solder. The writing is from a dictionary purchased at a 99 cent store (a nice source for collage materials). The ocean images are actual photographs I took at Sunset Cliffs. I experimented with different sizes of copper tape on which to solder, so this was all just a learning process. I was really surprised that I preferred the wavy tape--one I didn't think I would like. I thought I was going to prefer the wide tape, and I didn't like it at all. Hence why one needs to try all methods.

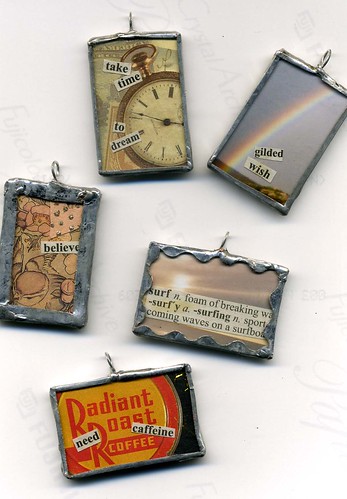
Here's the back side.
Charms back
I obviously need to practice my soldering, but not bad for a first go round. The rainbow here is a real photograph I took while driving (!) down highway 52 (a freeway) one afternoon. I am planning others to make soon, and will use them to embellish a small quilt I'm entering in a contest. More later....

Labels: ,